Basic Arduino UNO Bluetooth Testing with the BLE 4.0 (CC2541, MLT-BT04 IC)

Here is a sketch to do basic testing for the Arduino UNO and the MLT-BT04.

This BLE module works with IOS (iPhone) and I'll add some details on my IOS testing with an iPhone in a follow-up post.

For now, here is the basic BLE (HM-10) sketch for the Arduino UNO:

 /*
  Arduino test-code fir BLE MLT-BT04 to the Arduino board.
  BLE Version 4.0 Module chipset: CC2541
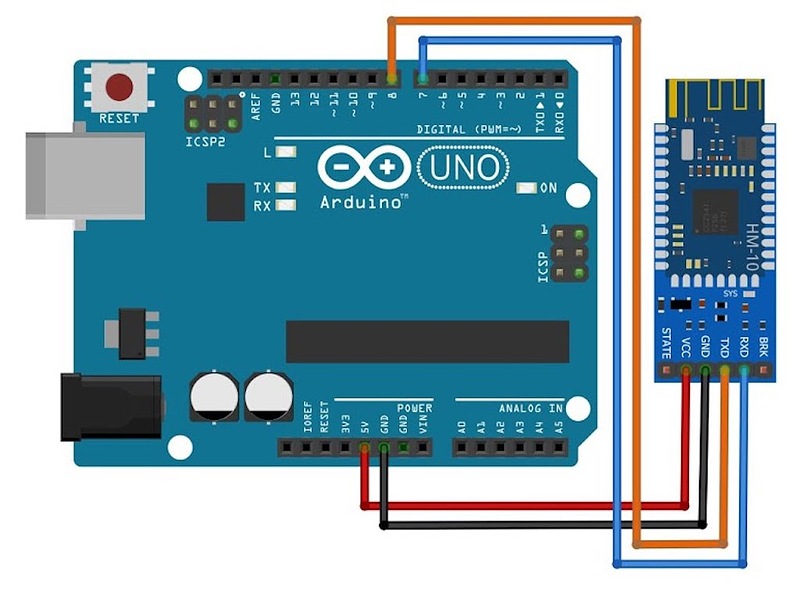
  Schematic:    Arduino D7   to MLT-BT04  TX
  Schematic:    Arduino D8   to MLT-BT04  RX
  Schematic:    Arduino GRD  to MLT-BT04  GRD
  Schematic:    Arduino 3.3v to MLT-BT04  ACC
  Prints Help Menu for the CC2541 and some other sample AT commands.
  Neo: www.unix.com  version 0.1 January 2020
  Modified version of an unattributed CC2541 firmware example sketch.
  Use as you wish, with or without attribution.
*/

#include <SoftwareSerial.h>
SoftwareSerial ble_device(7, 8); // RX, TX

String str_ii = "";
int ii_0 = 0;
bool debug = false;
void setup() {
  Serial.begin(9600);
  delay(1000);
  ble_device.begin(9600);
  delay(1000);

  // First, get all available functions from CC2541 firmware
  ble_cmdhelp();
  ble_cmdln("AT+LADDR");
  ble_cmdln("AT+NAME");
  ble_cmdln("AT+CHAR");
  ble_cmdln("AT+UUID");
  if (debug) Serial.print("\nEND BLE SKETCH\n");
}

void loop() {
}

void ble_cmdhelp() {
  ble_device.println("AT+HELP"); // list all AT+ commands
  while (true) { // loop to print all AT+ commands
    char in_char = ble_device.read();
    if (int(in_char) == -1 or int(in_char) == 42) {
      continue;
    }
    str_ii += in_char;
    if (in_char == '\n') {
      if (str_ii == String('\r') + String('\n')) {
        if (ii_0 == 0) {
          ii_0 = 1;
          continue;
        }
        break; // break after more than 1 empty carriage return and newline
      }
      Serial.print(str_ii);
      str_ii = "";
    }
  }
}

void ble_cmdln(String cmd) {
  if (debug) Serial.print("\nSTART " + cmd + "\n");
  ble_device.println(cmd); // get basic AT+ command
  delay(1000);
  while (ble_device.available() > 0) {
    char in_char = ble_device.read();
    if (in_char) {
      str_ii += in_char;
    }
    else {
      break;
    }
  }
  Serial.println(str_ii);
  if (debug) Serial.print("END " + cmd + "\n");
  str_ii = "";
}

Sample serial monitor output:

20:44:41.624 -> 
20:44:41.624 ->  Command             Description			           
20:44:41.846 -> ----------------------------------------------------------------
20:44:42.061 ->  AT                  Check if the command terminal work normally 
20:44:42.247 ->  AT+DEFAULT          Restore factory default			   
20:44:42.431 ->  AT+BAUD             Get/Set baud rate		           
20:44:42.612 ->  AT+RESET            Software reboot				   
20:44:42.836 ->  AT+ROLE             Get/Set current role.	                   
20:44:43.059 ->  AT+DISC             Disconnect connection                       
20:44:43.244 ->  AT+ADVEN            Broadcast switch  		           
20:44:43.423 ->  AT+ADVI             Broadcast interval		           
20:44:43.633 ->  AT+NINTERVAL        Connection interval                         
20:44:43.851 ->  AT+POWE             Get/Set RF transmit power 		   
20:44:44.061 ->  AT+NAME             Get/Set local device name                   
20:44:44.250 ->  AT+LADDR            Get local bluetooth address		   
20:44:44.432 ->  AT+VERSION          Get firmware, bluetooth, HCI and LMP version
20:44:44.653 ->  AT+TYPE             Binding and pairing settings		   
20:44:44.864 ->  AT+PIN              Get/Set pin code for pairing                
20:44:45.046 ->  AT+UUID             Get/Set system SERVER_UUID .            	   
20:44:45.231 ->  AT+CHAR             Get/Set system CHAR_UUID .            	   
20:44:45.447 ->  AT+INQ              Search from device		           
20:44:45.632 ->  AT+RSLV             Read the scan list MAC address		   
20:44:45.817 ->  AT+CONN             Connected scan list device		   
20:44:46.040 ->  AT+CONA             Connection specified MAC		           
20:44:46.222 ->  AT+BAND             Binding from device		           
20:44:46.443 ->  AT+CLRBAND          Cancel binding    		           
20:44:46.632 ->  AT+GETDCN           Number of scanned list devices		   
20:44:46.852 ->  AT+SLEEP            Sleep mode 		                   
20:44:47.036 ->  AT+HELP             List all the commands		           
20:44:47.467 ->  --------------------------------------------------------------- 
20:44:48.680 -> 
20:44:48.680 -> +LADDR=20:C3:8F:8A:54:4A
20:44:48.680 -> 
20:44:49.694 -> +NAME=MLT-BT05
20:44:49.694 -> 
20:44:50.713 -> +CHAR:FFE1
20:44:50.713 -> 
20:44:51.698 -> +UUID:FFE0
20:44:51.698 -> 

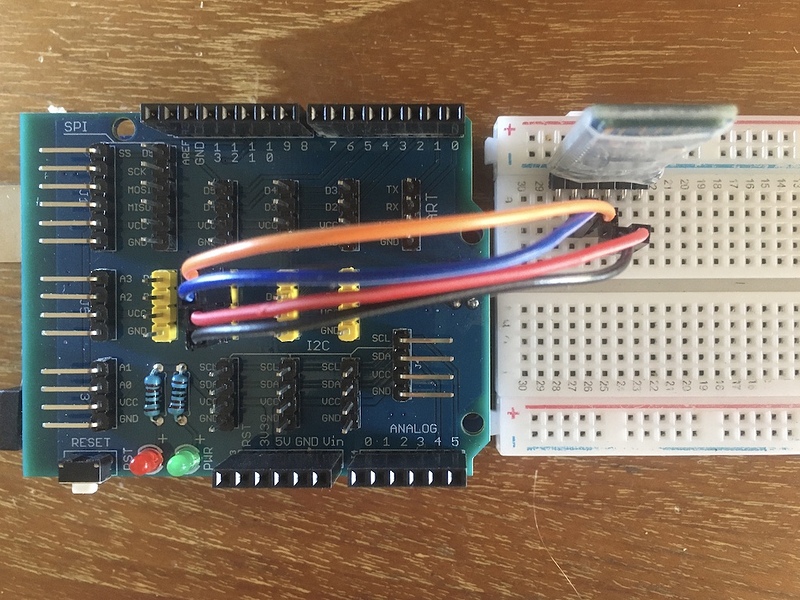
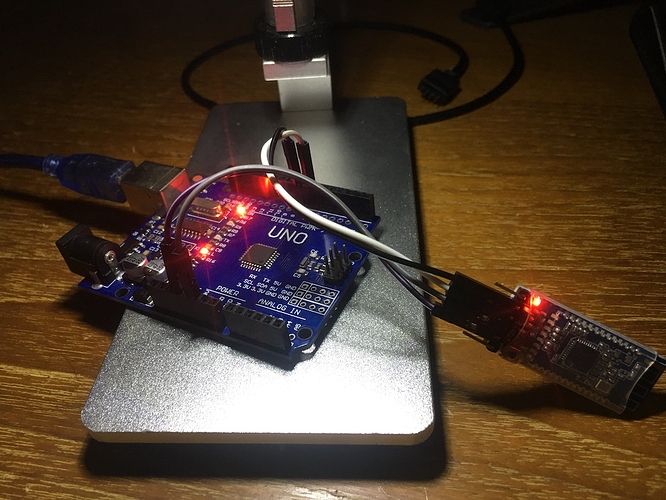
Simple setup (pinouts in sketch above):
1 Like

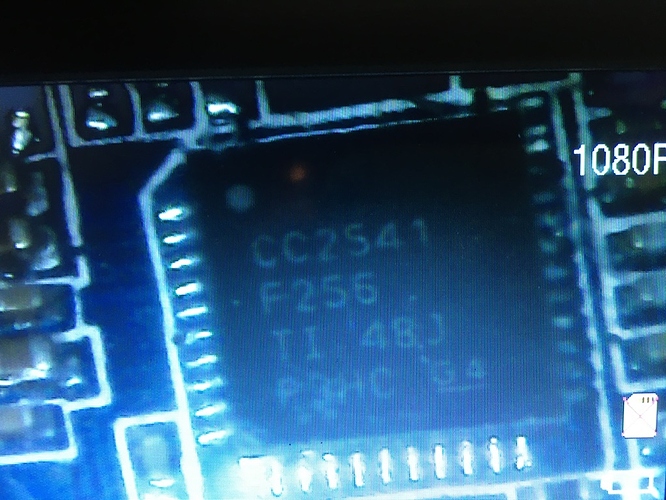
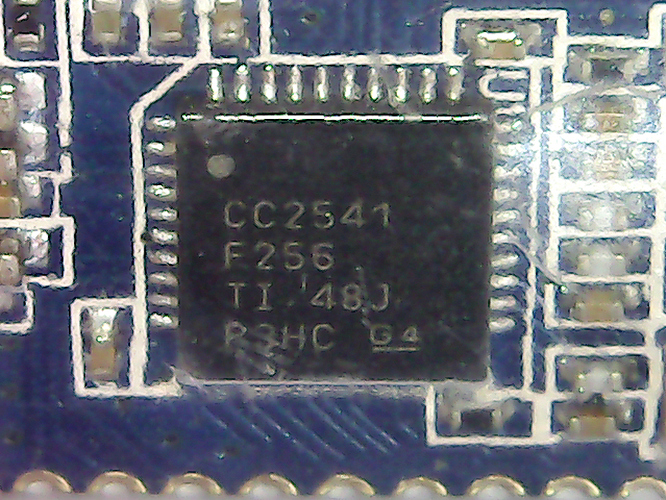
Here is the chip.... as I find these kind of details matter and are often omitted on these kinds of Internet tutorials and discussions. I will replace this photo (taken quickly with my iPhone) with a screen shot from my computer when I find the USB cable to my little microscope.

In fact, the way I got this test to work (finding a starting point sketch) was to use my microscope to read the model number on the chip: the CC2541

A number of times recently, I received some modules with the model number of the chip "burned off" with a laser, which is really annoying.

Update: Here is the same chip shot using the USB interface to my Mac Pro :

Both "chip shots" were taken though the plastic wrapper around the BLE module... that is why the image is a bit blurry)

To test Arduino BLE on the iPhone (my trusty 6S), I installed and tried a number of Arduino BLE apps from the Apple store, including these five apps:

  • BLE 101
  • LightBlue
  • ArduinoBlue
  • Blynk
  • Adafruit Bluefruit

Of all these IOS apps, I found ArduinoBlue to be the best, by far:

https://sites.google.com/stonybrook.edu/arduinoble/#h.p_Wf5FtzfPYJ9i

For example, in their basic sketch, with PIN setup as follows (TX, RX pins reversed from the first sketch above, FYI - which I changed to match the ArdunioBlue defaults):

/*
  ArduinoBlue example code to demonstrate the features of the app.
*/

#include <SoftwareSerial.h>
#include <ArduinoBlue.h>

const unsigned long BAUD_RATE = 9600;

// The bluetooth tx and rx pins must be supported by software serial.
// Visit https://www.arduino.cc/en/Reference/SoftwareSerial for unsupported pins.
// Bluetooth TX -> Arduino D8
const int BLUETOOTH_TX = 8;
// Bluetooth RX -> Arduino D7
const int BLUETOOTH_RX = 7;

int prevThrottle = 49;
int prevSteering = 49;
int throttle, steering, sliderVal, button, sliderId;

SoftwareSerial bluetooth(BLUETOOTH_TX, BLUETOOTH_RX);
ArduinoBlue phone(bluetooth); // pass reference of bluetooth object to ArduinoBlue constructor

// Setup code runs once after program starts.
void setup() {
  // Start serial communications.
  // The baud rate must be the same for both the serial and the bluetooth.
  Serial.begin(BAUD_RATE);
  bluetooth.begin(BAUD_RATE);
  delay(100);

  Serial.println("setup complete");
}

// Put your main code here, to run repeatedly:
void loop() {
  // ID of the button pressed pressed.
  button = phone.getButton();

  // Returns the text data sent from the phone.
  // After it returns the latest data, empty string "" is sent in subsequent.
  // calls until text data is sent again.
  String str = phone.getText();

  // Throttle and steering values go from 0 to 99.
  // When throttle and steering values are at 99/2 = 49, the joystick is at center.
  throttle = phone.getThrottle();
  steering = phone.getSteering();

  // ID of the slider moved.
  sliderId = phone.getSliderId();

  // Slider value goes from 0 to 200.
  sliderVal = phone.getSliderVal();

  // Display button data whenever its pressed.
  if (button != -1) {
    Serial.print("Button: ");
    Serial.println(button);
  }

  // Display slider data when slider moves
  if (sliderId != -1) {
    Serial.print("Slider ID: ");
    Serial.print(sliderId);
    Serial.print("\tValue: ");
    Serial.println(sliderVal);
  }

  // Display throttle and steering data if steering or throttle value is changed
  if (prevThrottle != throttle || prevSteering != steering) {
    Serial.print("Throttle: "); Serial.print(throttle); Serial.print("\tSteering: "); Serial.println(steering);
    prevThrottle = throttle;
    prevSteering = steering;
  }

  // If a text from the phone was sent print it to the serial monitor
  if (str != "") {
    Serial.println(str);
  }

  // Send string from serial command line to the phone. This will alert the user.
  if (Serial.available()) {
    Serial.write("send: ");
    String str = Serial.readString();
    phone.sendMessage(str); // phone.sendMessage(str) sends the text to the phone.
    Serial.print(str);
    Serial.write('\n');
  }
}

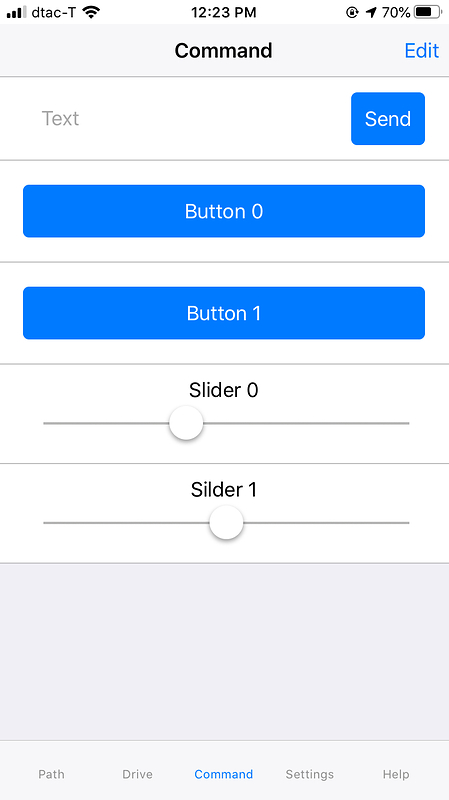
I set up two buttons and two sliders just like in the instructions, and everything worked "out of the box" (much better than all the other IOS BLE Arduino apps I tested). For example, here is the Arduino serial monitor output:

12:10:25.812 -> setup complete
12:10:27.597 -> setup complete
12:10:41.352 -> Button: 0
12:10:44.463 -> Button: 1
12:10:45.769 -> Button: 0
12:10:46.402 -> Button: 1
12:10:47.034 -> Button: 0
12:10:47.555 -> Button: 1
12:10:48.108 -> Button: 0
12:10:49.002 -> Button: 0
12:10:49.631 -> Button: 0
12:10:50.620 -> Button: 1
12:10:50.953 -> Button: 0
12:10:52.105 -> Button: 0
12:10:52.326 -> Button: 0
12:10:52.546 -> Button: 0
12:10:52.732 -> Button: 0
12:10:52.946 -> Button: 0
12:10:53.870 -> Slider ID: 0	Value: 104
12:10:53.870 -> Slider ID: 0	Value: 113
12:10:53.904 -> Slider ID: 0	Value: 121
12:10:53.941 -> Slider ID: 0	Value: 130
12:10:53.979 -> Slider ID: 0	Value: 147
12:10:53.979 -> Slider ID: 0	Value: 154
12:10:54.017 -> Slider ID: 0	Value: 163
12:10:54.054 -> Slider ID: 0	Value: 167
12:10:54.092 -> Slider ID: 0	Value: 170
12:10:54.092 -> Slider ID: 0	Value: 172
12:10:54.092 -> Slider ID: 0	Value: 174
12:10:54.130 -> Slider ID: 0	Value: 177
12:10:54.166 -> Slider ID: 0	Value: 179
12:10:54.204 -> Slider ID: 0	Value: 180
12:10:54.204 -> Slider ID: 0	Value: 181
12:10:54.278 -> Slider ID: 0	Value: 179
12:10:54.278 -> Slider ID: 0	Value: 176
12:10:54.315 -> Slider ID: 0	Value: 168
12:10:54.350 -> Slider ID: 0	Value: 156
12:10:54.384 -> Slider ID: 0	Value: 130
12:10:54.384 -> Slider ID: 0	Value: 121
12:10:54.421 -> Slider ID: 0	Value: 111
12:10:54.459 -> Slider ID: 0	Value: 101
12:10:54.495 -> Slider ID: 0	Value: 91
12:10:54.532 -> Slider ID: 0	Value: 82
12:10:54.532 -> Slider ID: 0	Value: 70
12:10:54.570 -> Slider ID: 0	Value: 61
12:10:54.607 -> Slider ID: 0	Value: 58
12:10:54.645 -> Slider ID: 0	Value: 54
12:10:54.645 -> Slider ID: 0	Value: 53
12:10:54.645 -> Slider ID: 0	Value: 52
12:10:54.682 -> Slider ID: 0	Value: 50
12:10:54.720 -> Slider ID: 0	Value: 49
12:10:54.720 -> Slider ID: 0	Value: 47
12:10:54.758 -> Slider ID: 0	Value: 46
12:10:54.795 -> Slider ID: 0	Value: 46
12:10:54.833 -> Slider ID: 0	Value: 45
12:10:54.833 -> Slider ID: 0	Value: 44
12:10:54.870 -> Slider ID: 0	Value: 44
12:10:55.014 -> Slider ID: 0	Value: 49
12:10:55.014 -> Slider ID: 0	Value: 64
12:10:55.052 -> Slider ID: 0	Value: 79
12:10:55.090 -> Slider ID: 0	Value: 94
12:10:55.128 -> Slider ID: 0	Value: 106
12:10:55.128 -> Slider ID: 0	Value: 111
12:10:55.165 -> Slider ID: 0	Value: 119
12:10:55.203 -> Slider ID: 0	Value: 123
12:10:55.241 -> Slider ID: 0	Value: 127
12:10:55.241 -> Slider ID: 0	Value: 130
12:10:55.279 -> Slider ID: 0	Value: 133
12:10:55.316 -> Slider ID: 0	Value: 135
12:10:55.353 -> Slider ID: 0	Value: 136
12:10:55.425 -> Slider ID: 0	Value: 128
12:10:55.425 -> Slider ID: 0	Value: 120
12:10:55.425 -> Slider ID: 0	Value: 112
12:10:55.464 -> Slider ID: 0	Value: 105
12:10:55.501 -> Slider ID: 0	Value: 91
12:10:55.501 -> Slider ID: 0	Value: 81
12:10:55.537 -> Slider ID: 0	Value: 78
12:10:55.575 -> Slider ID: 0	Value: 75

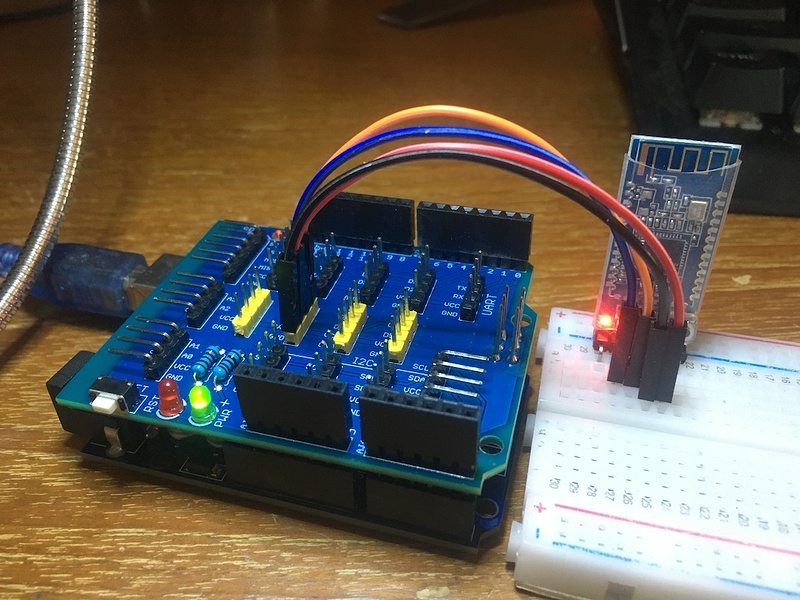
Here is the actual setup using a $2 - $3 Chinese Arduino sensor shield from my toy box:

Side Note: I'm starting too like all these cheap Chinese shields from AliExpress :slight_smile:

This is the ArduinoBlue test setup on the iPhone:

With the basics out of the way on the iPhone (for now), next I think I will look for / find / modify or write a Python app so I can play Arduino BLE from my desktop MacPro. Also, in that search, I'll also check to see what kinds of macOS apps are good for this caper (so far, I've not found any suitable BLE app for macOS, so my guess is I'll end up writing or modifying a Python project for BLE on the Mac).

1 Like

Update and Issues:

Having some problems with the ArdunioBlue IOS app because I cannot find any method / sketch to send data from the Arduino BLE module to IOS. However, sending data to the Arduino BLE module from IOS works fine. Unless I am missing something huge, the ArduinoBlue IOS app is "one way communications" only, as far as the user is concerned. I sent an email to the developer, but it bounced as "undeliverable". I would prefer to have BLE comms bidirectional, obviously.

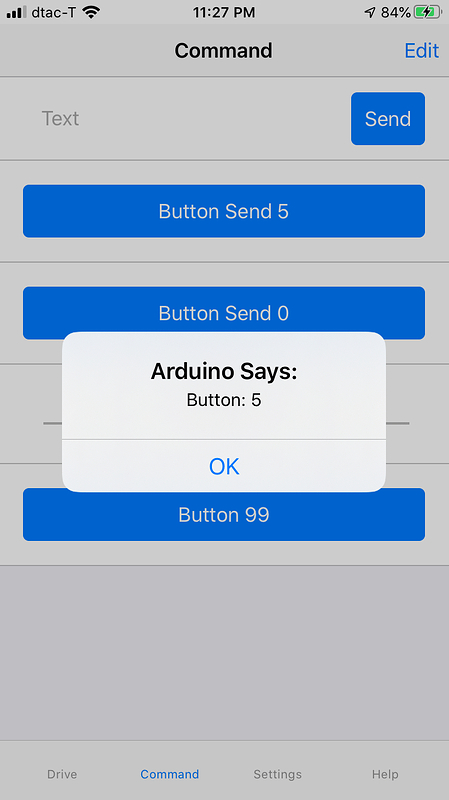
Edit(Update): I found more docs on ArdunioBlue and then found a method (which I have tested and it works) to send messages from the Arduino back to IOS:

void sendMessage(String text) - Sends the text to the phone as a popup

So, I then tried the Blynk IOS app again, running the basic Terminal sketch:

/*************************************************************
  Download latest Blynk library here:
    https://github.com/blynkkk/blynk-library/releases/latest

  Blynk is a platform with iOS and Android apps to control
  Arduino, Raspberry Pi and the likes over the Internet.
  You can easily build graphic interfaces for all your
  projects by simply dragging and dropping widgets.

    Downloads, docs, tutorials: http://www.blynk.cc
    Sketch generator:           http://examples.blynk.cc
    Blynk community:            http://community.blynk.cc
    Follow us:                  http://www.fb.com/blynkapp
                                http://twitter.com/blynk_app

  Blynk library is licensed under MIT license
  This example code is in public domain.

 *************************************************************
  Warning: Bluetooth support is in beta!

  You can send/receive any data using WidgetTerminal object.

  App project setup:
    Terminal widget attached to Virtual Pin V1
 *************************************************************/

/* Comment this out to disable prints and save space */
#define BLYNK_PRINT Serial


#include <SoftwareSerial.h>
SoftwareSerial SwSerial(10, 11); // RX, TX
    
#include <BlynkSimpleSerialBLE.h>
#include <SoftwareSerial.h>

// You should get Auth Token in the Blynk App.
// Go to the Project Settings (nut icon).
char auth[] = "YourAuthToken";

SoftwareSerial SerialBLE(10, 11); // RX, TX

// Attach virtual serial terminal to Virtual Pin V1
WidgetTerminal terminal(V1);

// You can send commands from Terminal to your hardware. Just use
// the same Virtual Pin as your Terminal Widget
BLYNK_WRITE(V1)
{

  // if you type "Marco" into Terminal Widget - it will respond: "Polo:"
  if (String("Marco") == param.asStr()) {
    terminal.println("You said: 'Marco'") ;
    terminal.println("I said: 'Polo'") ;
  } else {

    // Send it back
    terminal.print("You said:");
    terminal.write(param.getBuffer(), param.getLength());
    terminal.println();
  }

  // Ensure everything is sent
  terminal.flush();
}

void setup()
{
  // Debug console
  Serial.begin(9600);

  SerialBLE.begin(9600);
  Blynk.begin(SerialBLE, auth);

  Serial.println("Waiting for connections...");

  // This will print Blynk Software version to the Terminal Widget when
  // your hardware gets connected to Blynk Server
  terminal.println(F("Blynk v" BLYNK_VERSION ": Device started"));
  terminal.println(F("-------------"));
  terminal.println(F("Type 'Marco' and get a reply, or type"));
  terminal.println(F("anything else and get it printed back."));
  terminal.flush();
}

void loop()
{
  Blynk.run();
}

But after many tries, I cannot get the Blynk IOS app to connect to the Arduino BLE module, even thought it works fine with other IOS BLE apps, so I posted a question on this in the Blynk Community:

What's Up With Blynk? Cannot Connect With Basic Example Ardunio UNO / HM-10 Sketch?

https://community.blynk.cc/t/whats-up-with-blynk-cannot-connect-with-basic-example-ardunio-uno-hm-10-sketch/43204

Let's see if I can resolve this issue before my attention span moves on to another test setup :slight_smile:

10:55:06.367 -> [0] 
10:55:06.367 ->     ___  __          __
10:55:06.367 ->    / _ )/ /_ _____  / /__
10:55:06.367 ->   / _  / / // / _ \/  '_/
10:55:06.367 ->  /____/_/\_, /_//_/_/\_\
10:55:06.367 ->         /___/ v0.6.1 on Arduino Uno
10:55:06.367 -> 
10:55:06.367 -> [89] Connecting...
10:55:08.003 -> [0] 
10:55:08.003 ->     ___  __          __
10:55:08.003 ->    / _ )/ /_ _____  / /__
10:55:08.039 ->   / _  / / // / _ \/  '_/
10:55:08.072 ->  /____/_/\_, /_//_/_/\_\
10:55:08.107 ->         /___/ v0.6.1 on Arduino Uno
10:55:08.144 -> 
10:55:08.144 -> [89] Connecting...
10:55:11.258 -> [3229] Login timeout
10:55:13.266 -> [5229] Connecting...
10:55:16.369 -> [8349] Login timeout
10:55:18.359 -> [10349] Connecting...
10:55:21.494 -> [13469] Login timeout
10:55:23.512 -> [15469] Connecting...
10:55:28.623 -> [20589] Connecting...
1 Like

Update:

Well, I seem to have been wrong. I thought Blynk was a BLE app, but it's not. From the website:

My experience is that apps which try to be "all things to all platforms" often end of "nothing special for most platforms", so I think I will probably drop the Blynk line of investigation for BLE.

In fact, I may put the HM-10 BLE module back in my "module drawer" and move on to a new Arduino module soon. I have too many Arduino modules to test and my attention span is not very high for module testing, LOL

Update:

Have downloaded, installed and tried a number of python git repos for BLE and macOS. Could not get any of around four python BLE repos to work as I had expected or hoped "out of the box" (for example, no discovery or device listing worked) so I'm going to move this little HM-10 BLE module into temporary storage for now and move on to testing a different Arduino module / shield.

I may return to the HM-10 BLE module if I want to build a BLE app to control some relays with my iPhone, since I was happy with how ArduinoBlue worked OOTB. Unfortunately, ArduinoBlue development seems to be "dead" at the moment and the original developer's email bounces back "account deleted" .

Caveat, I deleted xcode off my mac months ago, so you may have better luck of you use a python wrapper over the xcode BLE libs.

My attention span is now very low with many Arduino modules and shields waiting, in dark, unopened, static resistant packages, to be freed from the drawer, wired up and coded. :slight_smile:

ArduinoBlue update:

Found some more ArdunioBlue docs:

https://github.com/purwar2016/ArduinoBlue-library/wiki/Documentation

Showing these classes:

ArduinoBlue class

phone(Stream obj) - Constructor pass SoftwareSerial object. Alternatively, you can pass any Serial. For example, on the Arduino Mega you can pass phone(Serial2) instead. Note if you use Serial, you won't be able to use serial communication through USB.

int getButton() - Returns once the ID of the button that was pressed. Returns -1 otherwise.

int getSliderId() - Returns once the slider ID of the slider that was moved. Returns -1 otherwise.

int getSliderVal() - Returns the value of the slider of the slider that was moved.

int getThrottle() - Returns the throttle value of the joystick.

int getSteering() - Returns the steering value of the joystick.

void sendMessage(String text) - Sends the text to the phone as a popup.

String getText() - Returns the text that was sent from the app's text box.

So, I was able to easily send test messages (using BLE) from the Arduino UNO back to the iPhone ArdunioBlue app using the sendMessage() method.

Basically, from all the testing I did so far, I'm quite happy with ArduinoBlue for IOS.

I think next I may combine this BLE app with NB-IoT to send command and control (C2) messages via BLE from my iPhone to a server on the Internet using an NB-IoT network and get C2 status messages and alerts back from the remote server to my iPhone the same way.

Here is my latest test sketch for the ArduinoBlue example app with the added message examples back to the iPhone.

Note that earlier I missed the method in the example sketch (see highlight in red below) to send a message back to the iPhone:

/*
  ArduinoBlue example code to demonstrate the features of the app.
*/

#include <SoftwareSerial.h>
#include <ArduinoBlue.h>

const unsigned long BAUD_RATE = 9600;

// The bluetooth tx and rx pins must be supported by software serial.
// Visit https://www.arduino.cc/en/Reference/SoftwareSerial for unsupported pins.
// Bluetooth TX -> Arduino D8
const int BLUETOOTH_TX = 8;
// Bluetooth RX -> Arduino D7
const int BLUETOOTH_RX = 7;

int prevThrottle = 49;
int prevSteering = 49;
int throttle, steering, sliderVal, button, sliderId;

SoftwareSerial bluetooth(BLUETOOTH_TX, BLUETOOTH_RX);
ArduinoBlue phone(bluetooth); // pass reference of bluetooth object to ArduinoBlue constructor

// Setup code runs once after program starts.
void setup() {
  // Start serial communications.
  // The baud rate must be the same for both the serial and the bluetooth.
  Serial.begin(BAUD_RATE);
  bluetooth.begin(BAUD_RATE);
  delay(100);

  Serial.println("setup complete");
  phone.sendMessage("Arduino setup complete");

}

// Put your main code here, to run repeatedly:
void loop() {
  // ID of the button pressed pressed.
  button = phone.getButton();

  // Returns the text data sent from the phone.
  // After it returns the latest data, empty string "" is sent in subsequent.
  // calls until text data is sent again.
  String str = phone.getText();

  // Throttle and steering values go from 0 to 99.
  // When throttle and steering values are at 99/2 = 49, the joystick is at center.
  throttle = phone.getThrottle();
  steering = phone.getSteering();

  // ID of the slider moved.
  sliderId = phone.getSliderId();

  // Slider value goes from 0 to 200.
  sliderVal = phone.getSliderVal();

  // Display button data whenever its pressed.
  if (button != -1) {
    Serial.print("Button: ");
    Serial.println(button);
    phone.sendMessage("Button: " + String(button));

  }

  // Display slider data when slider moves
  if (sliderId != -1) {
    Serial.print("Slider ID: ");
    Serial.print(sliderId);
    Serial.print("\tValue: ");
    Serial.println(sliderVal);
  }

  // Display throttle and steering data if steering or throttle value is changed
  if (prevThrottle != throttle || prevSteering != steering) {
    Serial.print("Throttle: "); Serial.print(throttle); Serial.print("\tSteering: "); Serial.println(steering);
    prevThrottle = throttle;
    prevSteering = steering;
  }

  // If a text from the phone was sent print it to the serial monitor
  if (str != "") {
    Serial.println(str);
  }

  // Send string from serial command line to the phone. This will alert the user.
  if (Serial.available()) {
    Serial.write("send: ");
    String str = Serial.readString();
    phone.sendMessage(str); // phone.sendMessage(str) sends the text to the phone.
    Serial.print(str);
    Serial.write('\n');
  }
}

ArduinoBlue is the "clear winner" of this round of BLE testing with the Arduino UNO and the iPhone.

1 Like