Arduino Project: iPhone to HM-10 BLE to NB-IoT Shield to NB-IoT Network to Internet to Linux Server

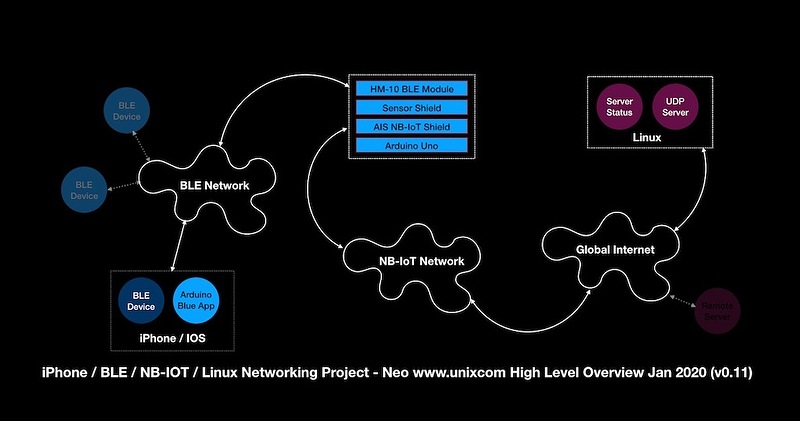
This post describes a "work in progress" project I started today. Here is the High Level Overview:

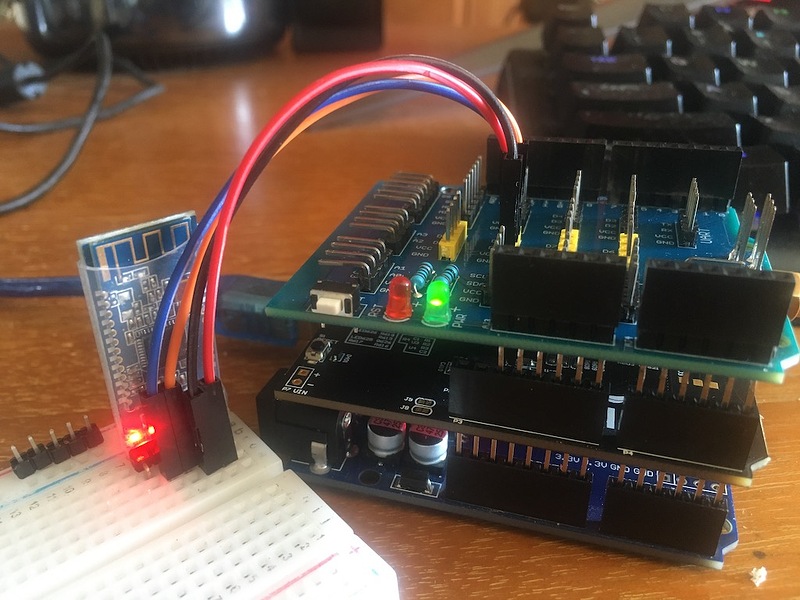
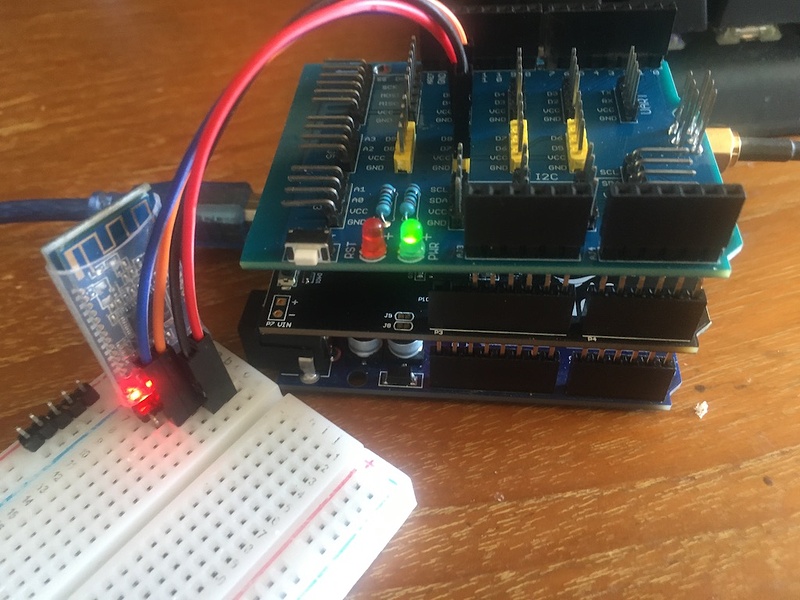
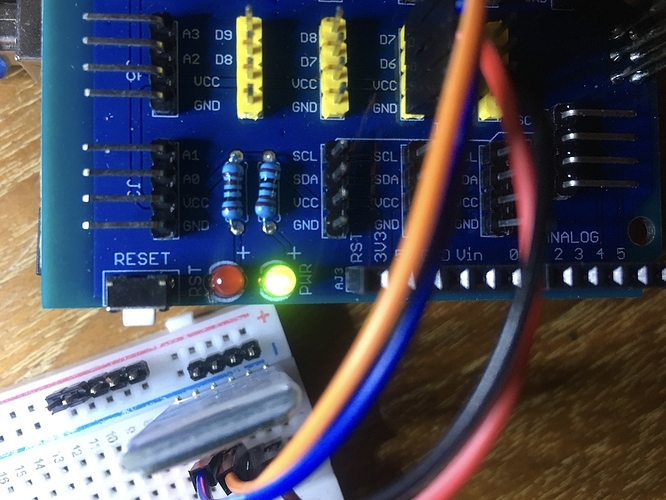
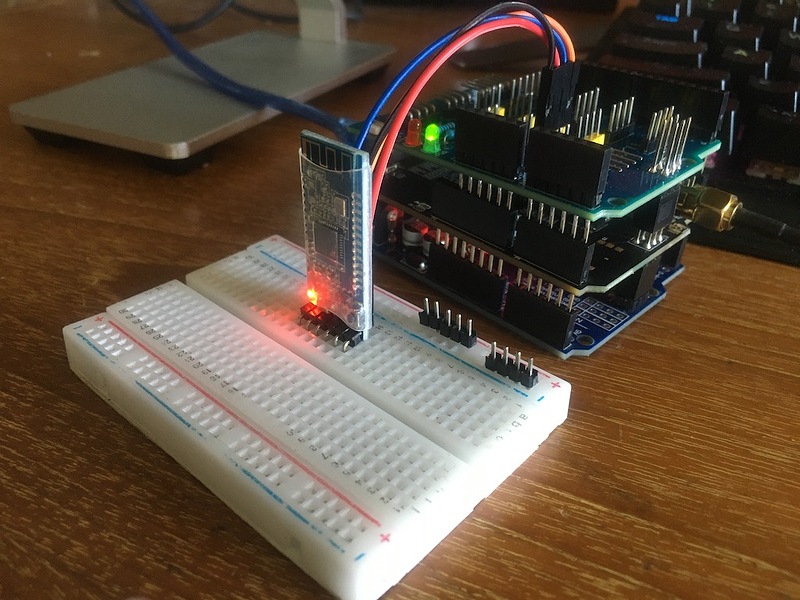
Currently, this project sits on my desk as an Arduino UNO (on the bottom), an NB-IoT Shield (sandwiched in the middle), a Sensor Shield (on top) with a HM-10 BLE Module (in the little bread board):

The goal of this project is to combine the simple results from these two Arduino tests:

In a nutshell, I am going to attempt to combine two different Arduino apps / sketches, which currently work independently, into one Arduino UNO sketch, which will permit me to press a button on the iPhone (using the ArdunioBlue app, tested in the link above) and send the BLE message to the Ardunio and then forward/send a message (based on the BLE data) to the NB-IoT network which will relay the message to a Linux server on the Internet; and then get some server stats based on the iPhone BLE message and return the results to me and display it in a popup message on the iPhone.

Basically, I have (1) the BLE part (from the iPhone to the Arduino) working fine (see link above); and I also have (2) the NB-IoT part between the Arduino and a Python UDP server on the other side of the world (across the global Internet) working independently of each other (also in a link above).

In addition, I have already combined these two projects into a single Arduino sketch, but when I enable both apps at the same time, there is a "yet to be debugged" (actually, I have debugged for about 30 mins but don't have the answer yet), conflict between the Arduino Serial communications between the two apps.

Basically, there are three Arduino serial comms in this caper (on the Arduino):

  1. The BLE Serial communications between the HM-10 BLE module and the Arduino UNO.
  2. The NB-IoT Serial communications between the NB-IoT shield and the Arduino UNO.
  3. The standard "serial monitor" output in the Arduino IDE.

The third one (the basic serial monitor) seems to be working fine. However, there is a "conflict" between the first two (the BLE and the NB-IoT serial comms).

When I enable one or the other, it works fine; but when I enable both at the same time, the NB-IoT lib setup() method locks up waiting on the availability of a serial device (in the library code). This leads me to believe there is a "conflict" between the serial comms in the two libs, since they were (obviously) not designed to work together.

So, that is where I stand today on this new project.

I could post the current Arduino "combined" sketch, but I would like to "read up" on Ardunio serial comms first and try another round of debugging before I do.

Why do this project in the first place?

Well, I wanted to do an Arduino project that "no one else has done." I have looked at around a bazillion YT videos (and Internet posts) of Arduino projects, and I'm not currently interested in opening trash cans with sonar or opening relays and turning off/on lights, controlling motors, and all the other "like minded" Arduino projects out there ad infinitum. Don't get me wrong. Those are all nice projects and I respect the makers, all of them. However, I'm inclined to network systems engineering and this project is useful to me, as follows:

Sometimes I want to know the load on a remote server or some other remote server / app statistic. If there is a problem with the Apache2 web server, of course it is hard to get the stats via HTTP because both the monitoring and the applications are in the same band (HTTPD, port 80). Also, when my home network is down (due to a fiber cable cut or some other local or international Internet provider anomaly), I cannot easily check the health of a server on the other side of the world.

So, in comes "out of bounds" remote server management. By using a commercial, wireless NB-IoT network, I can send small command and control messages back and forth between my iPhone and the server as described (and not use HTTPD). This will give me an out-of-bounds comm channel to check on the server even when my main Internet comms are down.

Also, I tend to like these kinds of networking projects more than opening boxes with radar or automatically watering my plants or turning on and off home automation relays or seeing how many 100s of km I can send a "Hello World" LoRa message, etc. Let's see how this networking project goes.

I'll post back after more debugging the serial comms in the libs and see if I can get past my current roadblock.

Stay tuned :slight_smile:

1 Like

Notes:

AltSoftSerial uses these pins on the Arduino UNO, according to AltSoftSerial_Boards.h (included with the AIS NB-IoT libs):

// Arduino Uno, Duemilanove, LilyPad, etc
//
#elif defined(__AVR_ATmega168__) || defined(__AVR_ATmega328P__)

 #define ALTSS_USE_TIMER1
 #define INPUT_CAPTURE_PIN               8 // receive
 #define OUTPUT_COMPARE_A_PIN            9 // transmit
 #define OUTPUT_COMPARE_B_PIN           10 // unusable PWM

My BLE module sketch (taken from an ArduinoBlue example sketch) uses pins:

// The bluetooth tx and rx pins must be supported by software serial.
// Visit https://www.arduino.cc/en/Reference/SoftwareSerial for unsupported pins.
// Bluetooth TX -> Arduino D8
const int BLUETOOTH_TX = 8;
// Bluetooth RX -> Arduino D7
const int BLUETOOTH_RX = 7;

So, not yet more more than an Arduino noob, my first guess is that I should move the Arduino UNO pins for the HM-10 BLE module to some supported SoftwareSerial pins which are different than the AltSoftSerial pins (8,9) above.

Seems the conflict is pin 8 being used by both SoftwareSerial (used in the BLE code) and AltSoftSerial (used in the NB-IoT code).

Will try different pins tomorrow and see how far that get me.

1 Like

Hi Neo...
I was thinking about this type of event but as I don't have the HW and code then I couldn't comment for certain.
Just one thing though, ensure whichever I/O pin you decide to use, make absolutely sure that it is not used for the two external HW boards at all.

This bit is weapon of last resort, it is possible to use one of the unused analogue inputs as a _digital_ input for RX.
Difficult - YES, probably VERY difficult, but it all depends on the analogue sample speed.

I have done it on my ancient Arduino Diecimila board but speed was not important...

Bazza...

1 Like

Update:

I have all the serial ports working together now.

The "conflict" was solved by moving the BLE pins from my original ArdunioBlue example sketch from (8,7) to (7,6):

// The bluetooth tx and rx pins must be supported by software serial.
// Visit https://www.arduino.cc/en/Reference/SoftwareSerial for unsupported pins.
// Bluetooth TX -> Arduino D7 was D8
const int BLUETOOTH_TX = 7;
// Bluetooth RX -> Arduino D6 was D7
const int BLUETOOTH_RX = 6;
SoftwareSerial bluetooth(BLUETOOTH_TX, BLUETOOTH_RX);

So, I've confirmed the NB-IoT shield is sending / receiving data and the BLE app is sending and receiving data:

23:18:37.770 -> ################################################################
23:18:37.841 -> # Sending Data IP=209.126.XXX.XXX PORT=YYYYY
23:18:37.917 -> # Data=50696e6720436f756e743a203133
23:18:37.917 -> # Send OK
23:18:37.917 -> 
23:18:37.917 -> ################################################################
23:18:37.992 -> # Sending Data IP=209.126.XXX.XXX PORT=YYYYY
23:18:38.066 -> # Data=626c652e73656e736f72203133
23:18:38.104 -> # Send OK
23:18:38.104 -> 
23:18:38.104 -> ################################################################
23:18:38.179 -> # Sending Data IP=209.126.XXX.XXX PORT=YYYYY
23:18:38.215 -> # Data=424c4520427574746f6e2031
23:18:38.253 -> # Send OK
23:18:40.076 -> Button: 5   <------ ArduinoBlue test data from iPhone
23:18:43.679 -> Button: 0   <------ ArduinoBlue test data from iPhone
23:18:48.946 -> Button: 99 <------ ArduinoBlue test data from iPhone

Tomorrow, if all goes according to plan and I get time to work on this, will do the next step in merging these two apps together and see if I can push a button on the iPhone and get the result on the remote Linux server (I'm confident this will be easy now); and then I'll write some mini-apps, like pressing a button on the iPhone and requesting the load averages of the server and pressing another button and getting some other metric like total number of users on the server.

From here, the rest of the coding should be a piece of cake.

More tomorrow.....

PS: One thing I am starting to notice is the lack of programming space (flash memory) on the UNO:

Sketch uses 20012 bytes (62%) of program storage space. Maximum is 32256 bytes.
Global variables use 1055 bytes (51%) of dynamic memory, leaving 993 bytes for local variables. Maximum is 2048 bytes.

Looks like I'll be moving to the Raspberry PI sooner than later :wink: :wink:

1 Like

In an earlier test of the AIS NB-IoT Arduino shield, I touched on the fact that the AIS 923MHz NB-IoT network tested illustrated "not the best reliability" due to spotty 923MHz cell tower penetration / coverage.

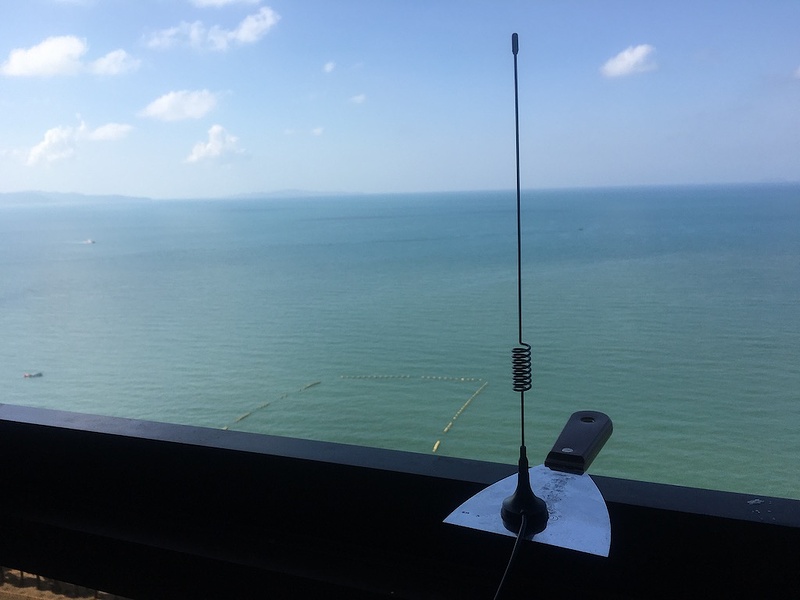
However, on the ocean side of my condo, I have improved this reliability issue a few DB (my RF power meter is not very accurate, sorry) with this antenna:

More importantly than potential antenna gain, the 923MHz NB-IoT signal is considerably more reliable after placing the antenna at the window and off my desktop (which is about 3 to 4 meters away from the window).

In addition, I have the Arduino sketch sending the message to a remote Linux server via BLE and the NB-IoT network and will post the code / sketch after I add a mini-app to get some server stats like the server load averages back to the iPhone. Just need to add a few lines of code to my test Python UDP server code and change the sketch to receive the result and display it on the iPhone.

So far, it's pretty simple (after working out the conflict between serial comm pins last yesterday).

More Arduino shield porn :slight_smile:

Update:

Well, there seems to be a new serial "conflict" when receiving data from the NB-IoT network with the BLE HT-10 serial comms in place.

The NB-IoT sketch will receive data without issues without the BLE serial comms enabled.

Back to the drawing board .... :o

Edit: Fixed bug, working now .... :slight_smile: will post code after I get the reply displaying on iPhone
1 Like

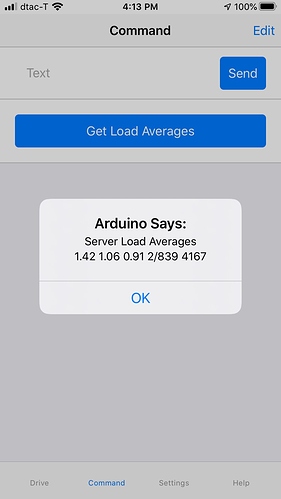
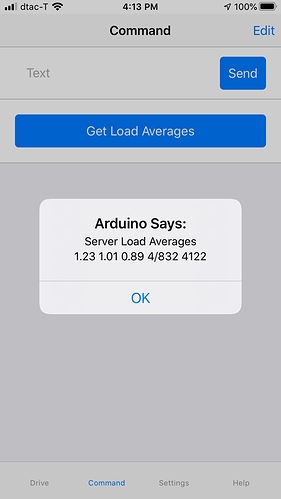
Success!

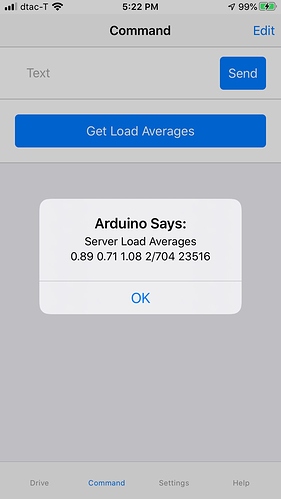
Push a button on the iPhone and send a BLE bluetooth message to the Arduino UNO who forwards the request to a remote server via a commercial NB-IoT network; where the server parses the request and returns the results back to the iPhone via the same NB-IoT / BLE link.

In this case we request the load average of a remote Ubuntu Linux server ' cat /proc/loadavg ' 12 times zones away. The remote server runs a Python UDP service "test app" for this "mini application" example.

BLE/NB-IOT/UDP internetworking :slight_smile:

I think I may well be the first "maker" to do this with the Arduino UNO, and iPhone, the HM-10 BLE module and an NB-IoT shield and commercial network... but I cannot be sure!

I'm currently testing reliability. Will post the draft Arduino UNO sketch and the Python UDP test server code when finished preliminary testing. Please don't expect a polished product, as this is just a demonstration using the iPhone to send a BLE message to the Ardunio with an NB-IoT shield to forward the request to a remote UDP server and display the results back on the iPhone.

Also, I think I should include a few more "mini-app buttons" for this demo.

2 Likes

It's quite amazing what we can do with a few pieces of Arduino electronics when we put our minds to it. New products can be created.

I always appreciate people who create "new knowledge" and that's what you're doing. Just proofing that it can be done so inexpensively is great.

1 Like

Yeah, I think it is really nice we can build a custom iPhone app which does not use WIFI or a direct network connection to the Internet to get server / network management data on the other side of the world.

Of course, the sky is the limit, and some people might like home or factory automation and other person might want to control a server, like force a reboot (of course the app would need some built in access controls), etc.

Here in Thailand, we can drive around in the country side in our car, without direct Internet access, and can push a button on our iPhone to get remote server stats via BLE.

.... and I built the prototype in a very short period of time.

I'm not trying to advocate BLE or NB-IoT (or even the Arduino, per se; instead this test just demonstrates one possibility of nearly infinite possibilities for creative makers.

For this app, I think I'll create a few more "mini-apps" via the push button command console (and then post the sketch) and move on to testing another Arduino / shield module.

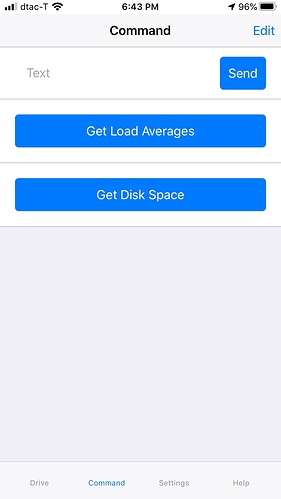
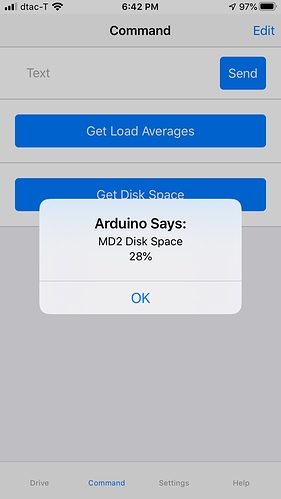
Added "Get Disk Space" button for the main boot disk, in this Linux Ubuntu case, MD2:

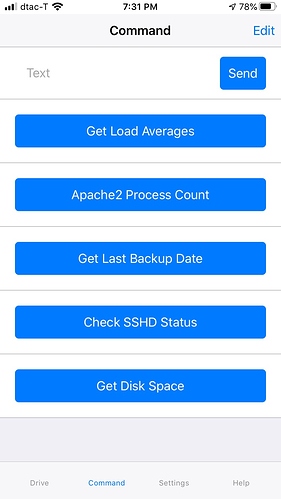
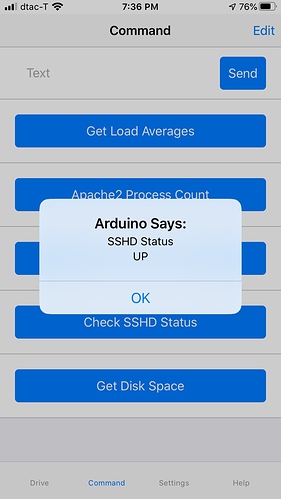
I'm "done for now" adding "mini-apps" to this demo app, with five little "mini-stats":

Of course, since the NB-IoT network is all UDP based, it would take considerable more coding to insure this kind of app is "truly reliable".

Here is the current "work in progress" rough draft of the Arduino UNO sketch for this demo / test.

Please free free to improve to code and repost your improvements back and use as you wish, free as a bird.

/*
  Arduino Project: iPhone to HM-10 BLE to NB-IoT Shield to NB-IoT Network to Internet to Linux Server
  Work in Progress by Neo version 0.01 Jan 2020
  Currently does not receive data from UDP server when doBLE() is active
  Comments welcome.
*/

#include <SoftwareSerial.h>
#include <ArduinoBlue.h>
#include "AIS_NB_BC95.h"
#define NBIOT true
#define BLE true
#define DEBUG2 true
#define ENABLE_BLE_IN_LOOP true
#define ENABLE_NBIOT_PING false

String apnName = "ble.nms";
String serverIP = "YOUR.IP.ADDR.HERE"; // Your Server IP
String serverPort = "YOUR_PORT";       // Your Server Port

String udpData = apnName;

AIS_NB_BC95 AISnb;

const long interval = 20000; //millisecond
unsigned long previousMillis = 0;

long cnt = 0;

const unsigned long BAUD_RATE = 9600;

// The bluetooth tx and rx pins must be supported by software serial.
// Visit https://www.arduino.cc/en/Reference/SoftwareSerial for unsupported pins.
// Bluetooth TX -> Arduino UNO D3 was D8
const int BLUETOOTH_TX = 3;
// Bluetooth RX -> Arduino UNO D4 was D7
const int BLUETOOTH_RX = 2;
int prevThrottle = 49;
int prevSteering = 49;
int throttle, steering, sliderVal, button, sliderId;

SoftwareSerial bluetooth(BLUETOOTH_TX, BLUETOOTH_RX);
ArduinoBlue phone(bluetooth); // pass reference of bluetooth object to ArduinoBlue constructor

void setup()
{
    // Start serial communications.
    // The baud rate must be the same for both the serial and the bluetooth.
    Serial.begin(BAUD_RATE);

    if (BLE)
    {
        if (NBIOT)
        {
            delay(10000);
        }
        bluetooth.begin(BAUD_RATE);
        delay(100);

        Serial.println("arduino ble setup complete\n");
        phone.sendMessage("Arduino setup complete");
    }

    if (NBIOT)
    {
        AISnb.debug = true;
        if (DEBUG2)
            Serial.println("NBIOT SETUP START\n");
        AISnb.setupDevice(serverPort);
        if (DEBUG2)
            Serial.println("NBIOT SETUP GET DEVICE IP\n");
        String ip1 = AISnb.getDeviceIP();
        delay(1000);
        if (DEBUG2)
            Serial.println("NBIOT SETUP GET DEVICE IP\n");
        pingRESP pingR = AISnb.pingIP(serverIP);
        previousMillis = millis();
        if (DEBUG2)
            Serial.println("NBIOT SETUP COMPLETE\n");
        if (BLE)
        {
            phone.sendMessage("NBIOT Setup Complete");
        }
    }
}

// Put your main code here, to run repeatedly:
void loop()
{
    if (BLE and ENABLE_BLE_IN_LOOP)
    {
        doBLE();
    }

    if (NBIOT)
    {

        doNBIOT();
    }
}

void doBLE()
{
    // ID of the button pressed pressed.
    button = phone.getButton();
    String msg = "";
    // Returns the text data sent from the phone.
    // After it returns the latest data, empty string "" is sent in subsequent.
    // calls until text data is sent again.
    String str = phone.getText();

    // Throttle and steering values go from 0 to 99.
    // When throttle and steering values are at 99/2 = 49, the joystick is at center.
    throttle = phone.getThrottle();
    steering = phone.getSteering();

    // ID of the slider moved.
    sliderId = phone.getSliderId();

    // Slider value goes from 0 to 200.
    sliderVal = phone.getSliderVal();

    // Display button data whenever its pressed.
    if (button != -1)
    {
        Serial.print("Button: ");
        Serial.println(button);
        if (button == 5)
        {
            msg = "GetLoadAvgs";
        }
        else if (button == 6)
        {
            msg = "GetDiskSpace";
        }
        else if (button == 7)
        {
            msg = "GetApache2Procs";
        }
        else if (button == 8)
        {
            msg = "GetLastBackup";
        }
        else if (button == 9)
        {
            msg = "GetSSHDStatus";
        }
        else
        {
            //phone.sendMessage("Button: " + String(button));
            msg = "Button: " + String(button);
        }
        UDPSend udp2 = AISnb.sendUDPmsgStr(serverIP, serverPort, msg);
        Serial.println("You sent to NB-IOT: " + msg);
    }

    // Display slider data when slider moves
    if (sliderId != -1)
    {
        Serial.print("Slider ID: ");
        Serial.print(sliderId);
        Serial.print("\tValue: ");
        Serial.println(sliderVal);
    }

    // Display throttle and steering data if steering or throttle value is changed
    if (prevThrottle != throttle || prevSteering != steering)
    {
        Serial.print("Throttle: ");
        Serial.print(throttle);
        Serial.print("\tSteering: ");
        Serial.println(steering);
        prevThrottle = throttle;
        prevSteering = steering;
    }

    // If a text from the phone was sent print it to the serial monitor
    if (str != "")
    {
        Serial.println(str);
    }

    // Send string from serial command line to the phone. This will alert the user.
    if (Serial.available())
    {
        Serial.write("send: ");
        String str = Serial.readString();
        phone.sendMessage(str); // phone.sendMessage(str) sends the text to the phone.
        Serial.print(str);
        Serial.write('\n');
    }
}

void doNBIOT()
{
    unsigned long currentMillis = millis();
    if (currentMillis - previousMillis >= interval and ENABLE_NBIOT_PING)
    {
        cnt++;
        Serial.println("Ping Count: " + String(cnt) + "\n");
        // Send data in String
        UDPSend udp0 = AISnb.sendUDPmsgStr(serverIP, serverPort, "Ping Count: " + String(cnt));
        UDPSend udp = AISnb.sendUDPmsgStr(serverIP, serverPort, udpData + " " + String(cnt));

        previousMillis = currentMillis;
    }
    UDPReceive resp = AISnb.waitResponse();
    if (resp.data.length() > 0)
    {
        String reply = AISnb.toString(resp.data);
        reply.replace(":", "\n");
        phone.sendMessage(reply);
        Serial.println("Received by NB-IOT sketch: " + resp.data);
        Serial.println('\n');
    }
}

Here is some very preliminary Python UDP server code this test / demo application.

Please feel free to clean it up and repost. Use it anyway you wish.

I know the Python code a mess, so please clean it up and post your "cleaner, nicer, prettier" code back in this thread if the spirit moves you to do so.

This is mainly a "debugging and testing script" and it NOT intended for production use at all.

FOR DEMO AND TESTING PURPOSES ONLY

#!/usr/bin/python3
"""
NB-IoT Test Code with ArduinoBlue
Listens on a port for UDP, simple authentication, echo back with unix time
Version 0.15 29 January 2020
Neo wwww.unix.com
Use as you wish.   If you improve it, please post back.
"""
import socket
import sys
import time
import subprocess

# Create a TCP/IP socket
sock = socket.socket(socket.AF_INET, socket.SOCK_DGRAM)
# sock.setblocking(False)
port = 1234  # your port number here
append = str(time.time())
file = "/root/debug/arduino/nbiot"+append+".log"
f = open(file, "w")
# Bind the socket to the port
server_address = ('your.server.com', port)
print >>sys.stderr, 'starting up on %s port %s' % server_address
f.write('starting up on %s port %s' % server_address)
sock.bind(server_address)
password = "my_simple_password\n"
authenticated = True
receivepw = True
lastsent = 0

while True:
    print >>sys.stderr, '\nwaiting to receive message'
    f.write('\nwaiting to receive message')
   now = time.time()

    data, address = sock.recvfrom(4096)
    print >>sys.stderr, str(time.time())+': received %s bytes from %s' % (len(data), address)
    f.write(str(time.time())+': received %s bytes from %s' % (len(data), address))
    stuff = str(time.time())+ ": "+ data
    print >>sys.stderr, stuff
    f.write(stuff)

    # override simple authentication  for now
    if data:
        lastsent = time.time()
        if authenticated == False and receivepw == False:
            sent = sock.sendto("Password: ", address)
            receivepw = True
        elif receivepw == True and authenticated == False:
            if data == password:
                sent = sock.sendto("Authenticated\n", address)
                authenticated = True
            else:
                sent = sock.sendto("Password:\n", address)
            print >>sys.stderr, 'a: sent %s bytes back to %s' % (sent, address)
            f.write('a: sent %s bytes back to %s' % (sent, address))
        elif authenticated == True:   #set to True all the time passing the auth code
            if '86940503122XXXXXXX' not in data:
                print >>sys.stderr, str(time.time())+': received %s' % (data)
                f.write(str(time.time())+':received %s' % (data))
                message = data
                # received = "You sent: " + data
                # sent = sock.sendto(received, address)
                # data = time.time()
               
                # data = "Unix Time: " + str(data)+"\n"
                # sent = sock.sendto(data, address)
                # sensor = sock.sendto("Sensor Data", address)
                # print >>sys.stderr, str(time.time())+': sent %s bytes back to %s' % (sent, address)
                # f.write(str(time.time())+': sent %s bytes back to %s' % (sent, address))
                doit = False
                if 'GetLoadAvgs' in message:
                    replydata = "Server Load Averages:"+subprocess.check_output(['cat', '/proc/loadavg'])
                    doit = True
                elif 'GetDiskSpace' in message:
                    tmp = subprocess.check_output("df | grep md2", shell=True)
                    tmp = tmp.split()
                    replydata ="MD2 Disk Space:"+tmp[4]
                    doit = True
                elif 'GetApache2Procs' in message:
                    tmp = subprocess.check_output("ps aux | grep apache2 | grep -v grep| wc -l", shell=True)
                    replydata ="Apache2 Processes:"+tmp
                    doit = True
                elif 'GetLastBackup' in message:
                    tmp = subprocess.check_output("ls -l /data/dumps | grep main | tail -1", shell=True)
                    tmp = tmp.split(".")
                    tmp = tmp[0].split("_")
                    replydata ="Last Backup:"+tmp[2]
                    doit = True
                elif 'GetSSHDStatus' in message:
                    tmp = subprocess.check_output("ps aux | grep sshd | grep sbin", shell=True)
                    if tmp > 0:
                        sshd = "UP"
                    else:
                        sshd = "DOWN"
                    replydata ="SSHD Status:"+sshd
                    doit = True
                if doit == True:
                    load = sock.sendto(replydata, address)
                    print >>sys.stderr, str(time.time())+': sent %s bytes back to %s message %s' % (load,address, replydata)
                    f.write(str(time.time())+': sent %s bytes back to %s message %s' % (load, address,replydata))
            else:
                received = "Rejected: Unauthorized EMEI"
                sent = sock.sendto(received, address)
        else:
            sent = sock.sendto("Error\n", address)
            print >>sys.stderr, str(time.time())+' : sent %s bytes back to %s' % (sent, address)
            f.write(str(time.time())+' : sent %s bytes back to %s' % (sent, address))
1 Like

Update:

I've posted the high level overview, the schematic, links, a lot of pictures, screenshots, discussion, and all my testing /working code (for testing purposes only).

So, for now I'm going to call this Arduino UNO project / proof-of-concept "good enough" and move on to testing a different Ardunio module or shield.

If you like this demo or find anything useful, I'm happy to hear about it. Please consider this demo "like an online notebook" of my testing and my results. Raw, unpolished, the "real deal", and no artificial sweeteners added :slight_smile: I tend to have a low attention span, so when I get a proof-of-concept like this up and running (and prove it works), even if the final results are not "polished", I then want to "call it good enough" and quickly move on to the next project.

If you want to improve the code and post your code back here, or elsewhere, that is even better. Share and share alike.

Either way, you are free to share and use any or all the the content in this test / demo (not designed nor created for production code); and so for now, this concludes:

Arduino Project: iPhone to HM-10 BLE to NB-IoT Shield to NB-IoT Network to Internet to Linux Server

Thanks!

2 Likes